 Event
Mosaic Creator -
Help Event
Mosaic Creator -
Help |
Event
Mosaic Creator -
Help
Functions and features
SpecialThe
application is build in functional tabs. Some of the tabs have also tabs
('sub-tabs') in which specific functionality is managed. On top you find a
simple shortcut menu bar, with a few application-wide functions, such as opening
the help documentation. There are 7 main
tabs: On the top of the
application's window, also a menu bar is seen. The menu bar has a couple of
additional and useful functions: 1. The Home tab
This tab is shown at the start of the application. You must
make a choice to use the application. The choices are New
mosaic or Recover. The first choice will start
a fresh new mosaic event, for which you must first set all the desired
parameters. The second choice will resume from a previous session (= the last one active before you closed the application), where all the settings are
recovered, and ready to resume the mosaic build up, printing, etc. 2. The Admin
tab This tab has 6 sub tabs.
The details are described in the tutorial (here). Some other
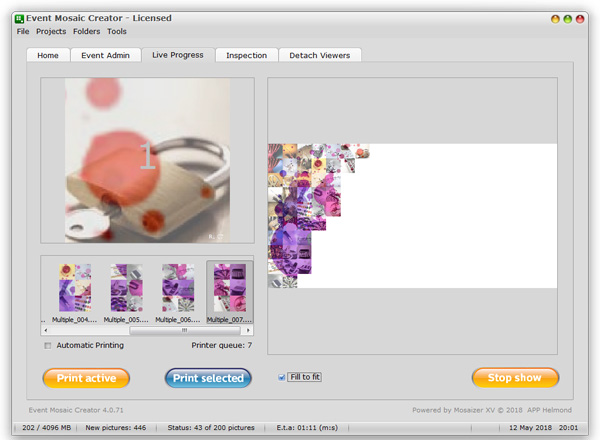
details are described here. 3. The Live
Progress tab This tab
has 3 placeholders, each of which is used to follow the progress of the mosaic
being built up, and the status of printing
the pictures. The image top-left shows the result of the
processed image. In case a multiple page print was selected (as shown in the
above screenshot), also the sequence number is shown (here #1 of 1). This
number represents the progress of completing a print page with multiple images. For
single print template the complete image, including template is shown (no
progress number is shown). The bottom-left overview shows the print queue. Here you
clearly see prints of 2x3 images. The checkbox Automatic
printing will send each ready available
print to the selected printers (see here
for more details of selecting multiple printers, and how to speed up printing).
If this option is inactive, this overview will show a growing amount of
images, waiting to be printed. To manually print images, you can also click on
any of the images in this overview, and then press the Print
sticker button. It will print the selected image, and remove it from this
queue.
The
large mosaic area on the right shows the progress of filling the mosaic. The sequence
of placement is set in the tools section, where the user can select
from 'optimized per tile', 'fully random', or 'sequenced, following a
so-called density map image where the darkest pixels correspond to the locations that are placed first, gradually down to the white parts, which are placed
last. Note: Please be ware that the amount of RAM taken by the
application will increase with increasing amount of images in the printere
queue. Each image will be internally stored (as a thumbnail), before it can be
seen in the interface. It won't be much, but as can be seen, already 200 MB is
used by the application. The used RAM consists of internal bitmap processing
(always uncompressed), templates and other ovehead data, such as mosaic viewers
(there are 3 of them), and log data. Several hundreds, or even thousands of images can take a quite a lot of active
RAM. Zoom and pan the mosaic
The 'Live Progress' mosaic viewer has zoom and pan
functionality. Below the viewer a 'Fill to fit' checkbox
is seen. When ticked the mosaic image is completely filling the available
area, and no zoom/pan is possible. When unticked a zoombar becomes visible.
Now you can zoom in and out, and by press-moving the mouse also panning is
possible. Re-ticking the 'Fill to fit'
checkbox will disable zoom/pan again, while removing the
zoombar. 4. The Inspection
tab
Here you find two
explorers: The box with file types on the left is a useful tool to
select the images, where the checkboxes act as filters of the filetypes that are
accepted by the application. The change of selection is immediate. Please be aware that
.PNG and .PSD files can be transparent. Some .PNG files are incorrectly saved and
may show large coloured stripes or blocks. The .PSD files are read as
composite images, meaning: flattening all the visible layers. Also .GIF images are read, but when animated GIFs
are found it will only take the first
frame.
The left folder is used as a temporary watched folder.
This 'Waiting Room'
folder is the folder where your #tag grabber
copies the images from the #tags, unfiltered. The Waiting room is actually a very
elegant way to assure that only appropriate images are used for the mosaic.
Only by selecting and dragging images from left to right, the watched folder
does what it normally does: in case an image is found, the application is
triggered to read, process and place the image in the mosaic, and adding it to
the printer queue. Just like what has been described in the
tutorial.
The elegancy
of this approach is that you
select your watched folder:
if you select the 'images' folder as the 'Watched' folder then no inspection is
done, and the images are processed when they arrive from your #tag grabbing
software, unfiltered. If you select the Waiting Room folder
as the target folder for your #tag grabber, nothing happens because the images
are not automatically copied to the 'images' folder. Only
manual interaction can now trigger the image processing and mosaic
build-up.
A second feature of the Inspection tab is to ability to remove an image from the
watched folder. This is done by selecting and dragging the (inappropriate) image
from the right to the left folder. So basically you put an image back in the
Waiting Room. Now, two actions can happen: you get an
information pop-up indicating that the selected image was already placed, and
that the image will be replaced. The other action is that the image is simply
removed from the right, and moved to the left folder. In the latter case the
image was not yet processed, and then a replacement image is not
required.
A few aspects are important to share, and
some basic rules must be
followed: There are several ways to remove of
change a placed image
In the above text, tile
replacement is done
from the Inspection tab. The tile selection
takes place based on the image itself. There are different ways to replace a specific
image, where you can replace a cerrtain image at a certain location. It is particularly
useful
if you want to select an image at a location, without
having to search for that image in the inspection tab, as explained
above.
There are three ways to identify an image on a spcified
location:
When you have correctly followed any of these three
approaches, and you resume the mosaic build-up again, the next available image
will processed and printed, and positioned in the indicated location. After the
replacement is completed, the information will be discarded, and the 'Add specific image'
data is removed, and the little (green) icon has
disappeared.
Note: this way of image replacement does not
work with the optimized image placement, only with sequenced
placement. 5. The Detach
Viewers tab
In
this tab three key features are managed. The first (Viewer detachment) being the possibility to detach a
viewer of choice from the application, meaning: a separate window will be opened
and the viewer of choice will be shown in that window. The second is to add a
countdown number. This number shows how many images still need to be placed. This
may be a nice interaction with viewers
at the event. The third feature
is
to also show winner locations (shown as small present logos). In
case a winner position is selected, that uploader
person will receive a
small present.
Home. This is the tab that is
visible after application start. The other tabs are still hidden. You must
make a choice: start with a fresh mosaic, or resume from the last session
('recover').
Event Admin. This tab has three sub
tabs, each with a specific functionality for event management. Here you also
find the 'Freeze data' and
'Unfreeze'
buttons to (un)freeze all parameters before starting
a new mosaic.
Live Progress. This tab is meant for the event
administrator, to manage and set all the relevant parameters of the event
mosaic (size, layout, printers, files, etc).
Inspection. In this tab two explorers keep track of
the incoming images (from the #tag grabber), and the approved images for the mosaic.
This way (human) inspection can filter out inappropriate images.
Detach Viewers. This tab
manages the viewers that can be shown on external monitors. The viewer in this
tab can be detached as a separate window, and dragged to an external monitor.
Also the event winners can be followed on the monitor and in this
tab.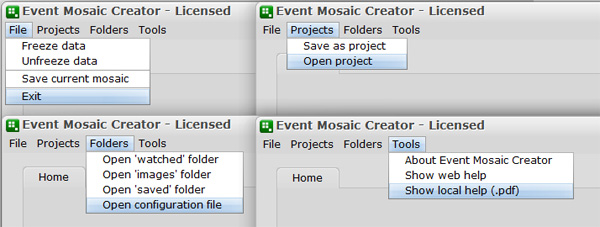
File:
Freeze or Unfreeze the settings as an alternative to
the 'Freeze data' and 'Unfreeze' buttons.
Save
current mosaic will save the mosaic as dispalyed in the 'Live Progress' viewer.Projects:
Save
as project will save almost all the settings in a project file. This
is very useful to test settings, without losing a good previous setting. It
will also allow for saving different events.
Open
project will reopen a previously saved set of settings. It's
important to also have the source image and folder structure in place, since
the project will save all the settings, including folders and
files.Folders:
Open
folders will open the indicated folder in the Windows Explorer. The
folder locations are as indication by the user in the 'Folder Locations' tab.
Open
configuration file will open the application's configuration file.
The config file is opened in Windows NotePad. It's highly recommended
not to edit this file, since it may be corrupting the data. It's merely a
convenient way of inspecting the current data, e.g. compared with that of a
project. Otherwise... do not use this feature.Tools:
About Event Mosaic Creator will show the current
application version.
Show
web help will open the default internet browser, and open the start
page of the help documentation.
Show
local help will open the help document (pdf format) in the default
Acrobat Reader application in Windows.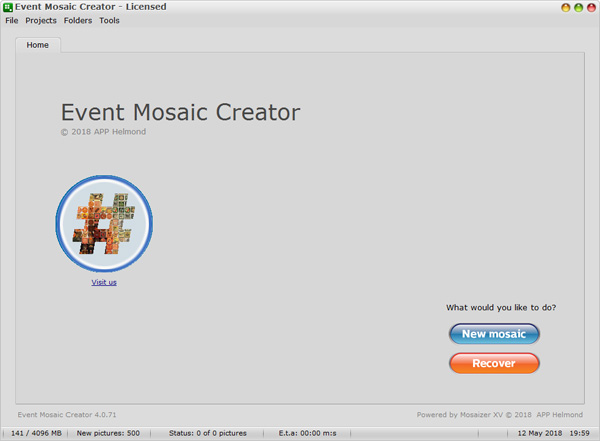
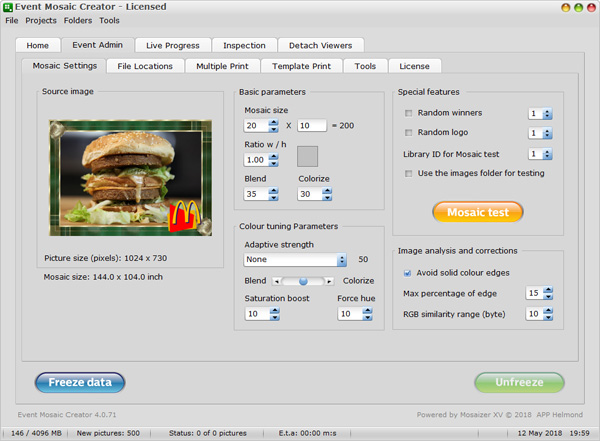
Mosaic settings: described here.
File locations: described here and in the tutorial.
Multiple print: described here and in the tutorial.
Template print: described here
and in the tutorial.
Tools:
described here.
License:
described here.
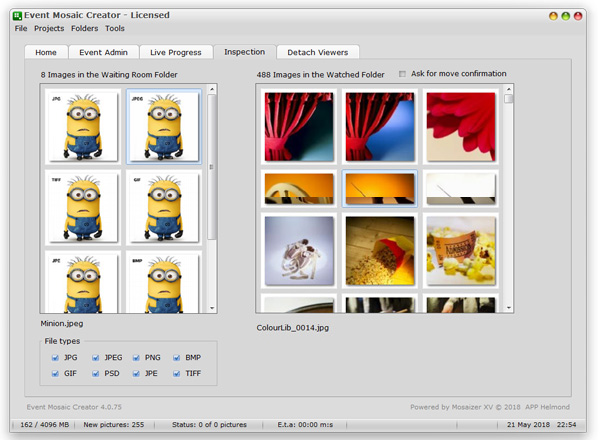
Left: the Waiting Room Folder. This
explorer shows all the pictures that are grabbed by the #tag grabber,
unfiltered.
Right: the 'images'
subfolder in the Watched Folder. This is the 'images' sub-folder in the
'Watched' folder as indicated in the Files
tab.
Ask for move
confirmation: to assure that the image move action is completed, a
confirmation is given. Default this is set to
'inactive'.
Only
when the application is paused in mosaic
creation and image processing, a removal action can take place. Multiple removals can be made
in such a paused sequence. The application is protected against running removal
actions.
When you have removed an image from the mosaic (it has
indicated such case) the user must complete the process, by resuming the mosaic
build-up.
A removal action will immediately remove the
image from the mosaic
location and
placement data. This means that the old image is virtually removed
from the mosaic, but still visible because no actual replacement was yet
done.
When you have removed an image, and then stop the
show (or exit
the application), the next time it will void the location of
the mosaic, because the image was moved. A new image will then be
found.
For sequenced mosaic creation the next
image will be the first replaced image in the sequence (details found here). In case multiple
images were deleted from the current
mosaic build, it will continue to replace old images. When no
images are to be replaced, it will resume to follow the sequence
again.
For optimized image placement, the replacement of
the image will be determined by the colour match of a new image. This might
take some time, there is no prediction of which image will fit where in the
mosaic.
The application does not give priority placement to missing images, it
will simply wait until a best replacement was found when new images
arrive.
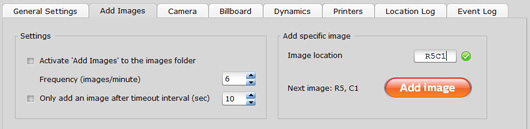
Indicate the location in the tab 'Add images', e.g. R5C1 (see example below). Then press
the 'Add image'
button to activate the
replacement at the provided location. When the little icon on the right turns
gree, the image location indeed contains an image, which be be replaced. If
this image turns red, then either there is no image to replace, or the
location is not within the boundaries of the mosaic size. The format must be
identical to the one that is selected for ethis event ('RC', 'Excel', 'Plain sequence').
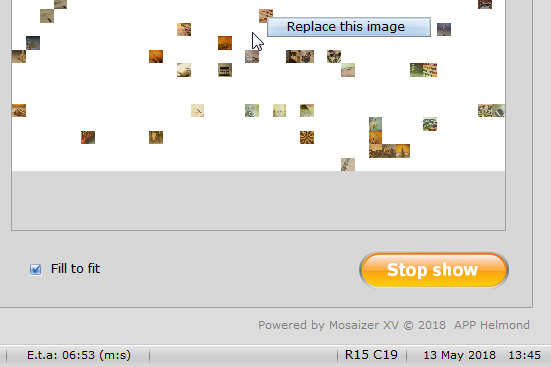
Press the CTRL key, while moving your mouse over
the mosaic viewer in the 'Live progress' tab.
In the status bar you see the current mouse/tile location. If you now right
click, a pop-up menu is shown, and you can select 'Replace
this image'. By completing this action, the same effect is achieved as
described in teh first approach. When you return to the 'Add images' tab, you will now see the information filled
in, and the 'Add image' action
started.
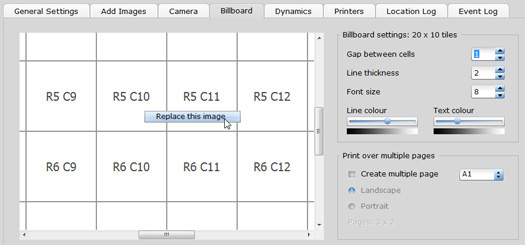
Open the Billboard tab. Similar to the mosaic
viewer you can select a cell/tile that you want the image to be replaced (use
the CTRL key to activate the location follower). The same procedure as the
msoaic viewer must be followed, and also here the activation is reflected back
in the 'Add image'
tab.
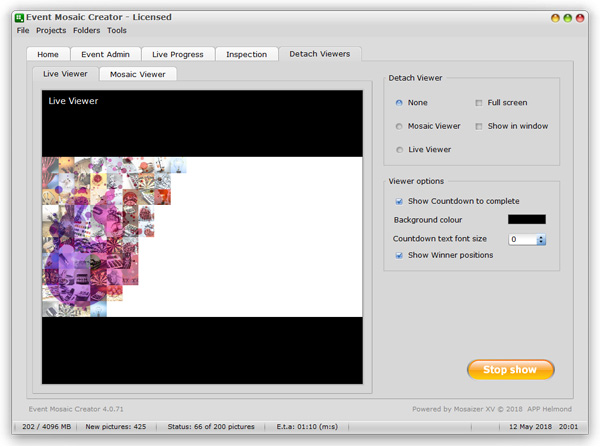
Mosaic Viewer or Live Viewer.
This is the choice of viewer you'd like to detach
from the application. The Mosaic Viewer differs
from the Live Viewer by already showing the
source image, while the Live Viewer only a white background is shown. The
None
option will
close the viewer windows.
The viewer of choice can be shown in a separate
window (Show in window) and Full screen. To
effectively use these options you first need to detach the viewer in a window, and then drag this
window to the external monitor/screen, and only then activate the options. This way the viewer
will be seen full size, and with no window any more
(rimless). If you do not drag the viewer to an external monitor the viewer will be shown
on your current screen, hiding all the controls (the application is hidden behind
the full screen viewer in that case). To exit the viewer, use the ESC
key on your keyboard.
Viewer options. These
options will set two visual aspects of the detached viewer. The first, Background colour, sets the colour of the monitor
background, in case the mosaic does not match with the aspect ratio of your
monitor. In our screenshot the background colour is black. Second, the Countdown timer. This timer shows how many locations are
still open, and where a new image can be placed. The counter is therefore a
countdown number. To hide the counter, you can uncheck the option Show Countdown to complete. Finally, the option
Show Winner positions will make the winner locations visible in the
viewer of choice. These are small icons, scattered randomly in the
viewer. When a #tag image is put on such an icon, a visual announcement
is made (text) to show that someone is entitled to a prize. This is optional,
and is also explained in the Admin tab (here).