Event
Mosaic Creator -
Help Event
Mosaic Creator -
Help |
Event
Mosaic Creator -
Help
Event admin
The event
admin tab has 6 sub tabs. While many of the functions in the admin tab are
described in
a dedicated chapter, or
in the tutorial, some remaining explanations is
described here. Important is to know that only from
this tab the settings can be fixed ('freeze'), and unfixed ('unfreeze'). The
reason for freezing the application critical parameters is to assure that during
an event the mosaic data does not get corrupted by different settings, or by
system issues (e.g. a power down, or empty battery), or a serious system issue
(BSoD still happnes...). The application will successfully retrieve the data,
but only when all the settings are identical. Event Mosaic
Creator
has the
possibility to save settings in a project file, and re-open this project. But in case this
was not done, or overwritten, deleted, etc, then to get the event back in place is
almost impossible without knowing the correct parameters. Henze the freeze (=
critical parameters are disabled, and cannot be changed), and unfreeze (all
parameters are enabled to be changed). In case of an unfreeze action, the user
has to be aware what unfreeze means, so the user is warned to be very, very
careful when changing settings during an active event.
Non-critical parameters, such as
colour tuning parameters, remain active since they are only used per image, and
will not affect the mosaic integrity. Although not recommended, to tweak mosaic
settings these enabled parameters are useful to find the best setting, while the
mosaic builds up. Once satisfied, the user is recommended to first freeze the
parameters, then save the settings in a project file (via the menu: 'Project' > 'Save as
project'). And then run the show. 1.
Mosaic Settings Most details are described in the tutorial page (here), but the remaining is described
here. Cropping a part
of the source image To only use a part of the
source image to create the mosaic, you can select (crop) a part from the source
image as shown in the interface. You need your mouse to select a part of the
image, left-top to right-bottom. It's important to understand how this cropping
works: only the part that you select from the source image will be used for the
mosaic. The amount of tiles (set horizontal, vertical will follow) is set by the
user, but the vertical amount is determined by the aspect ratio of the cropped
part. Just cropping a part might result in a weird amount of tiles, because the
tiles shape doesn't allow for a neatly cropped part, and will slightly deform
the source image to meet the amount of images. So: closely keep an eye on the
indicated amount of tiles (it actively refreshes itself from the selection you
are making). Keep on selecting an area to both satisfy your cropped part
and the amount of images. To select a square part, press the ALT key while
selecting a part of the image. To deselect a cropping area, doubleclick in an
area that is not selected, and the selection will disappear (and the full image
will now be set as the mosaic). Take a look at the images below, and see how the
cropping is done, and how the size, amount and cropped area together determine
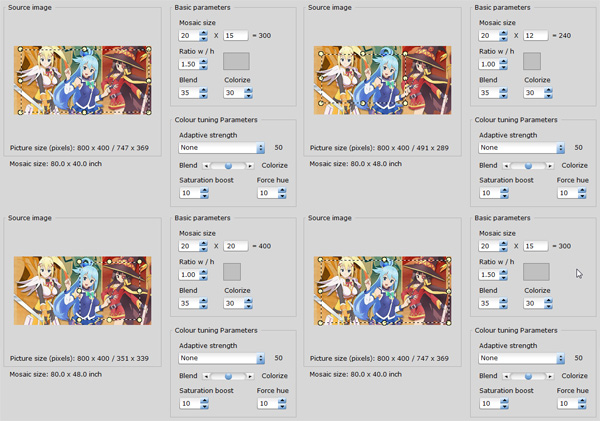
the final size of the mosaic. Setting
the tile aspect ratio By
default, the printed images are square. But the application allows for
rectangular shapes as well, both in portrait and in landscape orientations. The
width:height ratio of each printed #tag image can be set by the 'Ratio w/h'
paremeter, in steps of 0.01. The default
is square (or ratio = 1.00). A value smaller than one means portrait images, a
value higher than 1 means landscape images. When this ratio is changed, also the
amount of vertically placed images will change, in order to meet the dimensions
of the source image. The number of images on the horizontal will not change with
changing 'w/h ratio'. When e.g. landscape is selected (> 1), the vertical
amount will increase, since the height decreases. The amount on the horizontal
is still the measure for the final mosaic size, so the amount on the vertical
size is always following the source image size and the ratio settings, and can
therefore not be set manually. The gray square on the right of this settings
will change with the value, to reflect the actual #tag image size ratio. The
ratio change can be combined with the cropping. The application will
automatically take both parameters into account. Note: the gray square reflects a landscape shape
by increasing its horizontal size. Please do not take this as 'the horizontal
tile size will increase'. It doesn't, it's simply a more effective way to show
the relative tile size. How to assure a proper size setting. In many
cases the source image does not exacly fit with the mosaic tile size. For
eaxmple, we have a source image of 800x500 pixels, and want 90 images on the
horizontal. Ideally, we should then have 500/800*90 = 56.25 images. It will
round-off to the nearest number, so 56 images. When using 4x4" square images,
the actual mosaic size will be 90x4" x 56x4" = 360" x 224". The original source
image (of enlarged to this size) would actually be 360"x 219" (350*500/800 =
218.75) because the source size does not match with the amount of images. So,
thesource image will be slightly stretched to match with the output
size. This is
acceptable when a large amount of images is used, since 224" or 219" is not that
much that it becomes clearly visible (it's covered in images anyway), but for
relatively small amounts (e.g. 20 images or less) the deformation can be
visible. One way to counter the difference is to weak the amount with the aspect
ratio to make the match better. The consequence is that Billboards might not fit
(some users use prepared Billboards, only suitable for square images), or the
multiple prints on a sinple page needs careful post-processing cutting. But it
can be done. The tweak in this case would be to make the images slightly
portrait or landscape (either way will work). To set the correct value, you need
to do some maths in e.g. Excel to assure a proper amount and size ratio setting.
You can do the maths yourself, we found these settings to match with the
example: 90 Hor tiles, size ratio of 0.96, so 54 tiles on the vertical
(90/800*500*0.96 = 54), or size ratio 1.12, leading to 63 images on the
vertical. 2. File
locations
The multiple print tab was explained in the tutorial
chapter (here). 4. Template
print
The multiple print tab was explained in the
tutorial chapter (here).
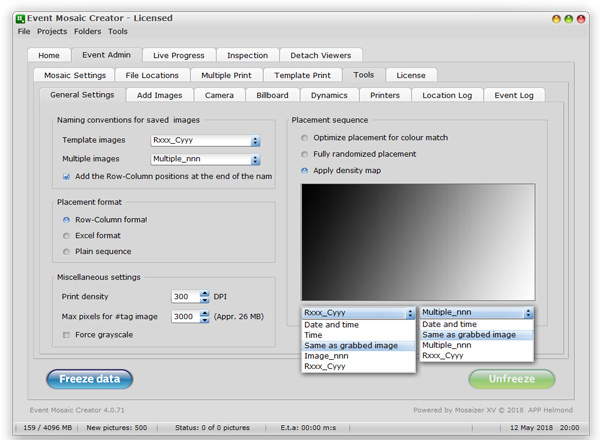
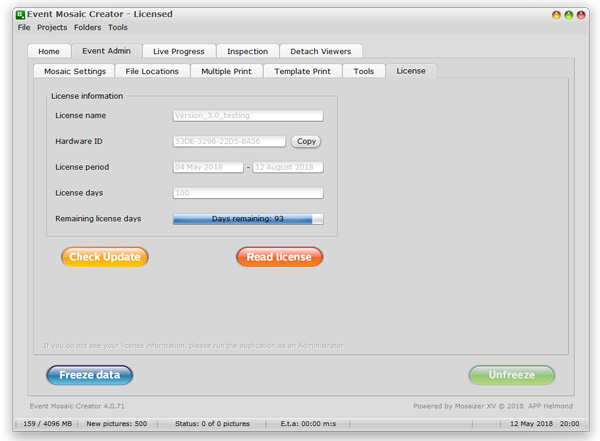
5. The
Tools tab
This tab is explained in a dedicated chapter (here). 6. The
License tab
This tab is explained in a dedicated chapter (here).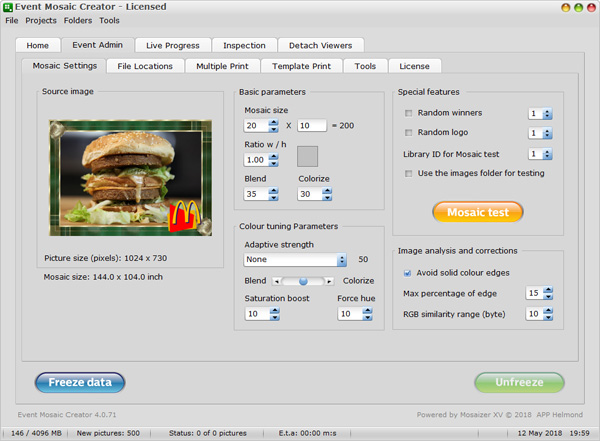
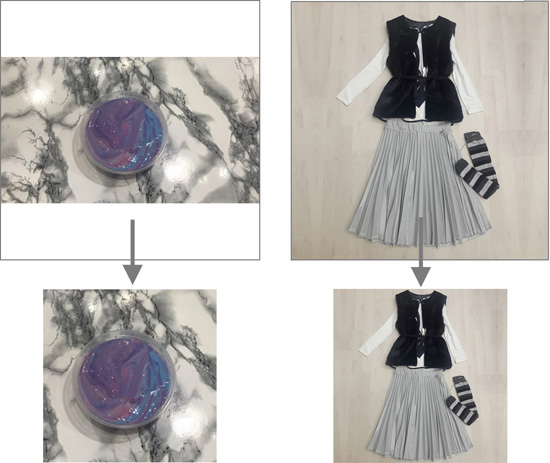
An example is shown above:
the top images are unprocessed, while the bottom images are processed with the
default settings. Not all images can be effectively processed,
e.g. images with text. This text can hardly be detected as text, and
will therefore remain part of the image. The white background may
however still create large colour differences. Text images should therefore be excluded, or only allowed when
large very light areas needs to be covered with images. It's the responsibility
of the event admin to filter out these images, or clearly indicate what kind of
images must be #tagged by the event visitors.
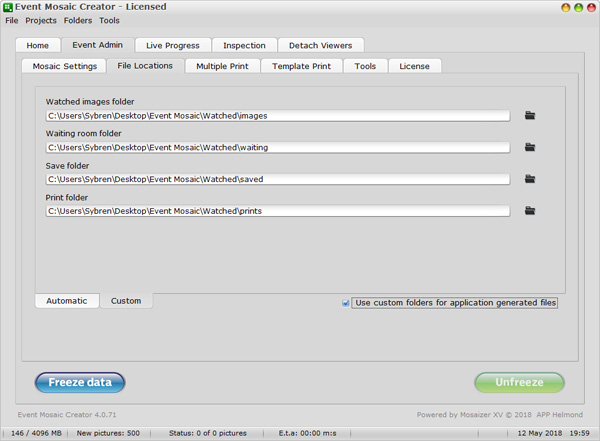
 The details are provided in the tutorial
chapter (here). In
addition you can select different sub-folders of the watched folder. There are
4 sub-folders that can be set. When the 'Use custom
folders for application generated files' is checked, a second tab will be shown. In this new tab you can now indicate your
own sub-folders. If you change any of these folder locations,
it's not possible to resume from an existing event, since these data are critical
operation data and you can only change these folder locations at the start
of an event. After changing these parameters, the user is strongly recommended to save
the settings as a project file, and run a test event, e.g. with stock images.
When all works as expected, the user should first re-save the settings
again in a project file and, then allow these settings to be used in
an event.
The details are provided in the tutorial
chapter (here). In
addition you can select different sub-folders of the watched folder. There are
4 sub-folders that can be set. When the 'Use custom
folders for application generated files' is checked, a second tab will be shown. In this new tab you can now indicate your
own sub-folders. If you change any of these folder locations,
it's not possible to resume from an existing event, since these data are critical
operation data and you can only change these folder locations at the start
of an event. After changing these parameters, the user is strongly recommended to save
the settings as a project file, and run a test event, e.g. with stock images.
When all works as expected, the user should first re-save the settings
again in a project file and, then allow these settings to be used in
an event.
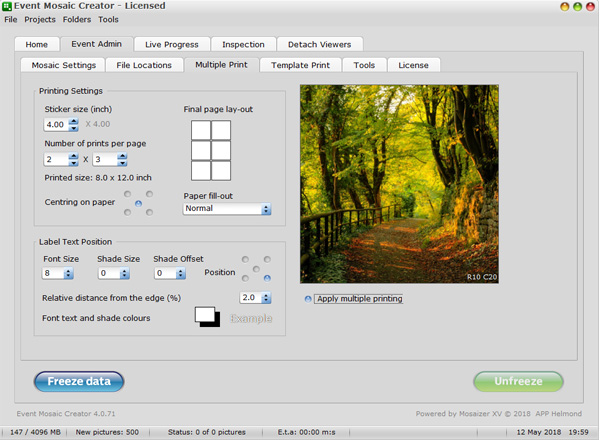
 3. Multiple
print
3. Multiple
print