 Event
Mosaic Creator -
Help Event
Mosaic Creator -
Help |
Event
Mosaic Creator -
Help
Tutorial and quick start
To start an event mosaic creation
session, please follow these 5 steps: Step 1: The initiation of
your event Start the
application, and make a choice: resume from a previous session, or start a new
one. This will restart a mosaic session from scratch. The choice has no
data-loss consequences to existing data, since changing any parameter
without having them fixed, ( the 'Freeze data'
button) no changes are made to any
folder, file or otherwise. In this
tutorial (quick start) we will show you how to start
with a fresh new mosaic. So we press 'New mosaic'. Then
select the 'File locations' tab, to define the
location and content of the inputs and outputs of the application. These
folders are critical for a proper operation of the the application, so great
care must be taken. The default folders and files are already set: when
installing the default folders are saved on the Desktop, conveniently called
'Event Mosaic'. Also the required folder structure is in place, and several
input files are defined. We will explain each folder in this tutorial, because
it's vital that the user understand the need for it and how to work with these
folders. When the box 'Use custom folders for
application generated files' is checked, a second tab is shown,
where the default subfolders of the watched folder can be manually selected. We will
not demonstrate
that in this tutorial. Instead we will show how to use the application with
the default folder settings. The
default 'watched'
folder has a predefined
structure: In this
tutorial, we do not
change anything in the part of
the first step. The reason to make a side-step to this tab, is to show how
the data is stored, where it is stored, and which folders are critical for a
proper operation of the application. In case of #tag grabbing, the user still
has to use a third-party application (e.g. 4k Stogram) to grab images from a
#tag server. Event Mosaic Creator does not grab images from a #tag
server. Step 2: The initiation of the mosaic image
settings Open the
Mosaic settings tab, and check/update the parameters
for your target mosaic. On the left you see a
composite image of a source file. This file is of type .psd (Photoshop) and
contains not only the source image (the bottom layer), but also an attractive
border (2nd layer), and a logo (3rd layer). You can use as many layers as you
like. The bottom layer ('background') is the layer that is recognized as the source
image. In this case a healthy hamburger. Also, no-layered images can be used, as
long as they are of .bmp, .jpg (.jpeg), .png or .psd file format. Other formats
are currently not read. In case you use a source image which is partly
transparent (e.g. a .png file), the transparent parts can
be showing strange colours. It is highly recommended to only use fully opaque
images.
Next, the size of the mosaic needs to be set. The size is determined
semi-automatically if you change the amount of images on the horizontal in the Basic parameters, the vertical amount
is automatically adjusted. You cannot change the amount of vertically placed
images. It follows the horizontal mosaic size and the aspect ratio of the source
image. You can crop a part from the image (here), which is then used to determine the correct amount
of images on the vertical axis.
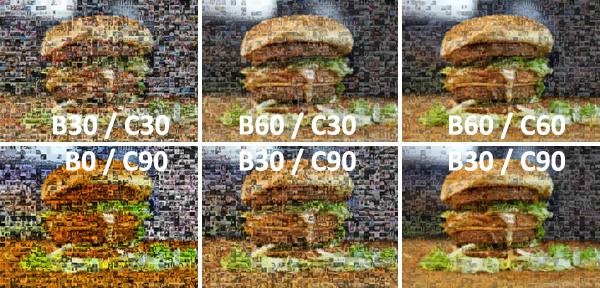
The second box called
Colour tuning parameters is another way to set your
colorize and blend parameters. You can select a value from the Adaptive strength selection box: Subtle, Mild, Normal, Aggressive and Extreme. The default value is None,
meaning: use the manual settings for Colorize
and Blend, as explained in the previous paragraph. These settings will increase
the blend and colorize effect between 30% to 90%, where 100% blend is basically the source
image, and 100% colorize is a mosaic where the hues are copied
from the source image, and the luminance is copied from the #tag images. The
distribution between blend and colorize is managed via the slider: Blend to the
left, Colorize to the right. The value is indicated in the number right
of the adaptive strength box, default to 50. In the two images be,ow you
can see the effect of a selected strength and a 10-50-90 setting of the
blend/colorize distribution slider: 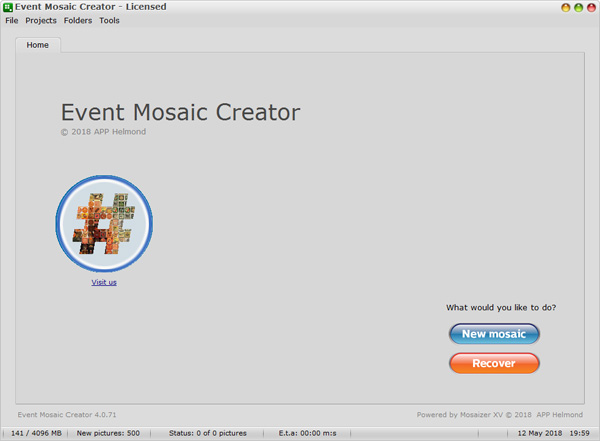
Watched (root) folder: the root
folder where all the data from the
application is saved. This folder has 5 mandatory sub-folders, explained below. It depends on the
image/data grabbing application what kind of data is saved. We recommend to use
4K
Stogram. Its freeware (with a very small cost to allow for unlimited
downloads). Next to only images, the Event Mosaic Creator can
also use the #tag text, sender name and sender image. The current amount
of #tag pictures in the watched folder is now indicated (here: 'New pictures:
500').
Template folder: the folder where
the print layout templates are stored. These templates must be ready made,
preferably in the correct print quality, e.g. 1500 x 2100 pixels for a 300 dpi
print of 5 x 7 inch print, including the
commercial messages. Templates are typically used when you want a print with
sponsor messages, or event information. Templates also have the possibility to add the uploaders name and image
(only when #tag grabbers are used).
Source
image: the image from which the mosaic is created.
This image will be recreated with the (uploaded) #tag images.
Logo image: the image of a logo,
which can be shown at regular intervals. Only one image can be selected. This image will
become part of the mosaic, and should also be printed, like any other image.
Density image: the image that is a
representation of the positioning sequence. The positioning sequence can
be optmized (determined by the best colour fit), fully randomized,
or following a pattern. The pattern is 'coded' by the density map. This 'coded'
map is a grayscale image (no colours!), where the darkest pixels will
be placed first, gradually following the predetermined placement sequence until the lightest parts
are reached (the last placements). Ideally, the density image has the same size
as the amount of images in the mosaic, or multiplications
thereof. Density maps are therefore small images (e.g. 100x50 pixels for
a 100x50 tiles mosaic). We have added a few examples in the
installation.
Extra
images folder: the folder in
which additional (prepared) images are stored. These images can be added to
the mosaic, e.g. when not enough images are send via the #tag address, or some typical colours
are likely not available, and these images can fill that 'void' of colours effectively.
By some it's considered as 'cheating', but it will save the mosaic if the
progress from new pictures gets too slow and time rushes
out. 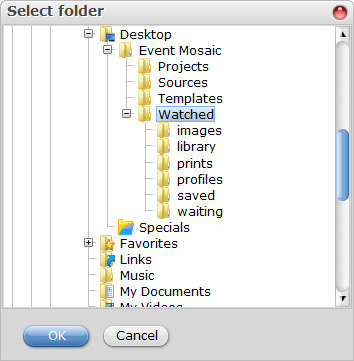
images = the folder where
all the #tag images are saved (required folder).
library = the folder where
back-up images are stored that can be used to fill the mosaic from prepared
images.
prints = the print-ready files that
are queued for printing during an event
(required folder). Images in this folder still need to be
printed.
profiles = the folder where the text
files are stored of the #tag sender (optional folder, required for
e.g. BYO Booth).
saved = the folder where all the
processed images are stored (required folder), as the end-stage of the process. Images
in this folder are fully processed and printed.
waiting = the folder where all
images are stored,
brom the #tag grabber, before sending them to the images folder
for processing. 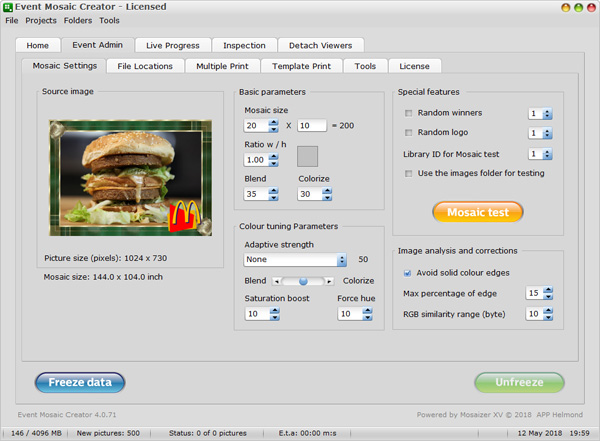
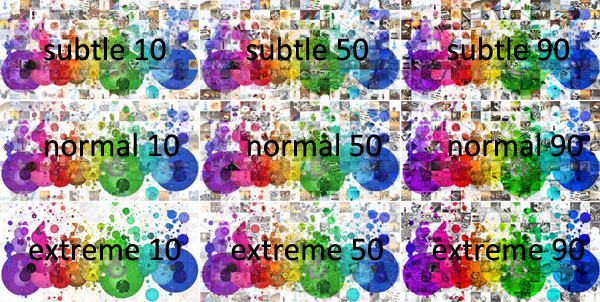
Details from the previous image. Note the different blend (10 <-) and colorize (-> 90) effects.
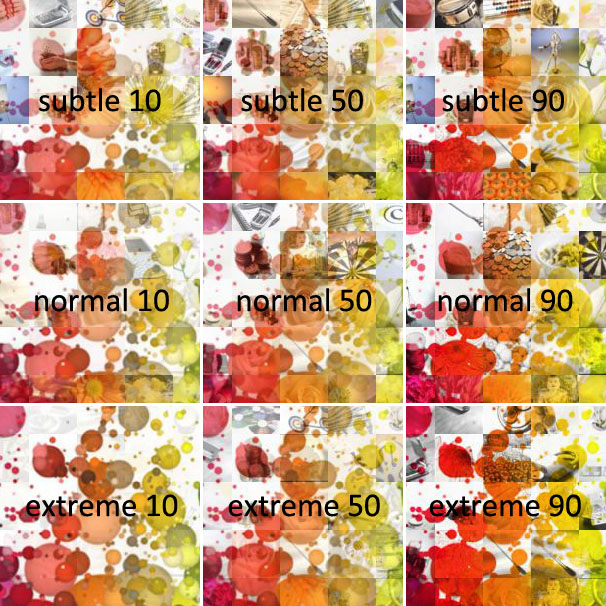
Finally, the parameters for Saturation boost and Force hue will correct the #tag image to better match with the colours of the source ('hue') and the saturation boost will create a more pronounced colour. Too much saturation will create extreme colours, but also might be considered 'over the top colours'. In some cases a bit boost can counter for the blandness of the #tag images, which are typically taken with mobile gadgets, so usually not studio quality colours.
It's highly recommended to adjust these settings well before the actual event, because it can take considerable time to tweak the colour settings right, to check the print colour quality and the overall effect of the images on the entire mosaic. The best way is to use dummy #tag images (any #tag will do, such as #animals, #amazing and similar), and then run a full mosaic. It can even take a couple of hours the first time you use the application (learning curve) to get it right. The most difficult colours are black and white. There is no recipe for it, just hope for the best, or add a couple of 'cheating' images (see step 3). Below you find some examples of settings to get you started more quickly.
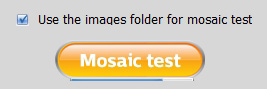
In this Quick start we will not elaborate on the two remaining settings (Special features and Image analysis and corrections). See here for details on these features. To check the mosaic you could press the button Mosaic test, but it uses internal images, called 'library' (about 3 different types of images, 1000 pictures for each type of library). To use you own test #tag images, you should check the tick box Use the images folder for mosaic test (at least 100 images are required), and see the effect of your chosen settings:
Activate the creation of your specific image library, by checking the tick box. A progress bar below the button will now be visible:
Wait until this bar reaches its max and to disappear. Now you are ready to use the library of your own images. Press the Mosaic test button. Your current values for blend and colorize are taken into account, so you can pretty accurately tweak your mosaic settings. After completion of the mosaic preview the image is opened in the default picture viewer of your Windows system.
Step 3: Define your print template
Open the Multiple Print tab. This tab shows the default print output of 4x4 inch, 2x3 prints per page on an 8x12 inch paper. Since 8x12 inch is a not a going paper size, but rather 8.5 x11, you might consider reducing the print size of each individual image, or accept fewer images per page (so: only 2x2 images of 4x4 inch). You can of course also use 4x4 inch label printer, and set the amount of images per page to 1x1. In that case indeed only one image is printed per page, and sent to the printer. Typically label printers are suited to process this kind of output. Please assure that your intended printer paper matches with the output size from Event Mosaic Creator. In most cases you also need to set-up your printer to accept the output from the application.
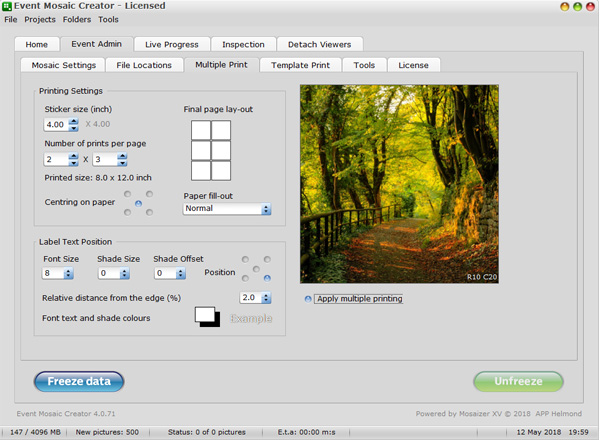
Then choose the location of the Row-Column location, placed on each print. This is required to make sure the image is placed on the correct location on the mosaic billboard. In the settings group Label Text Position several settings are provided. The effect of each setting is immediately reflected in the dummy picture on the right.
If you wish to apply this template, then the application will gather the amount of #tag images until a page is filled, and then save the page, ready for printing. You still have to manually cut the prints as a post-print-processing step! To activate this template press the Apply multiple printing box below the template preview image.
An alternative template is provided in the Template Print tab. A similar interface is shown, but this template has much more options to put additional information on the print-out. To select a template, use the drop-down selector in the Available templates section of the interface. To apply this template, activate the Use this printing template box. This will automatically uncheck the multiple print template option (and vice versa).

In the above image you see the default template for a single image per page. This template has 4 elements that can be set and activated:
In this template you have sufficient space to add your company logo, and other sponsor messages. You might require special paper to allow the #tag uploader (who sends the image, and gets this print to place the image onto the mosaic billboard) where the mosaic image should seamlessly be removed from the rest of the printed template.
Step 4: Initiate the #tag event mosaic
Open the Live Progress tab. The initial view is en empty tab, where only three placeholders are found, each providing essential output. left top is the placeholder for each print (refreshed when new images get processed). On the right the progress of the total mosaic image is seen. Finally, left bottom is the printer queue, where processed images are shown, ready to be printed. In case you restart the application from a previous session, this overview will show you the current contents of the '/prints' folder (a sub-folder of the 'Watched' folder).
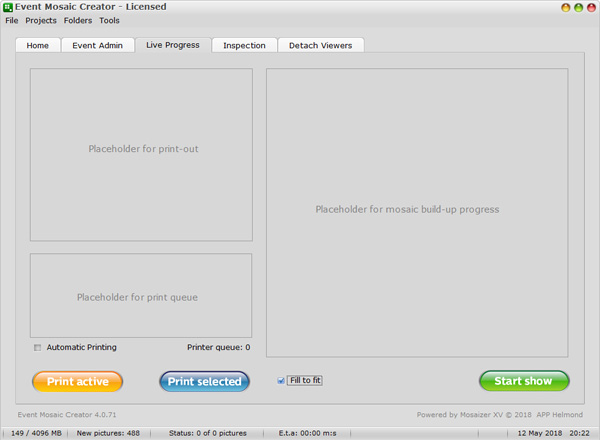
At first, the button Start show is inactive and cannot be clicked. To enable the show, you need to first fix the current settings in the Event Admin tab. This button on found in that tab, bottom right. After having pressed the blue Freeze data button, return back to this tab. Now the placeholders are active (yet empty) and the Start show button is active. Please be aware, that after having activated the 'freeze' action, that button becomes disabled, and only by restarting the application, or by 'unfreezing' the data, you can change key settings again. To Unfreeze, press the green Unfreeze button. During an active mosaic, critical parameters and controls are disabled.
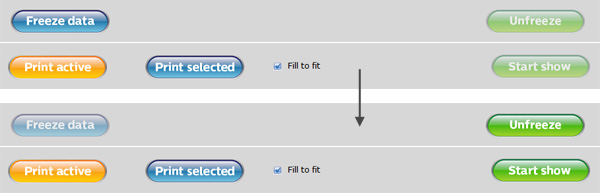
Image above: the two top screens are shown when the application starts with a new mosaic. When freezing the data, the bottom screens are shown.
Next, there are two different scenarios:
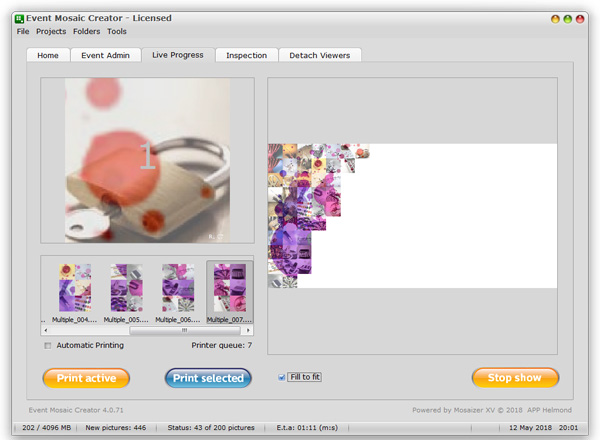
In the above screenshot you see the mosaic creation in action. The placeholder for prints is being filled (because Automatic Printing is not checked), the current processed image is shown (left top), and the progress of building the mosaic is shown on the right. The button Start show caption has also changed to Stop show. The current processed image has also a number ('1' in the screenshot above). This indicates the number of images that are being added to a printed page. In this case 1 to 6 because we wanted 6 images per page. This is also seen in the printer queue where all prints have 6 images on the page. In case a single template was chosen, one image per page would have been resulted.
In case of 'Multiple template' (so multiple prints on one page) a button becomes visible: 'Print active'. In case you wish to force-print a multple page (without waiting for the next image to arrive), you can do so. The sequence will not be changed, and when the page is completed, it will again appear in the print queue. This option is not available for 'Template print', because each individual image is completed, one image per page.
In the status bar of the application you can follow the progress of processing the #tag images. In this case 446 pictures are already available in the images folder, of which 43 have been processed, and 7 images are waiting in the printer queue. At the current processing speed, the last of the 200 image is ready after an estimated 1 minute and 11 seconds. You can check the printer queue: 7 prints, 6 images each = 42 images, the 43rd is just being processed, so 43 images ready is correct indeed. Since we have chosen to apply a density map, the sequence is built-up from top left, to bottom right.
Step 5: Pause and resume
The last step in this tutorial / quick start is to show how you can stop or pause the mosaic build-up, and resume from the last status of the build-up. To stop or pause the show, press the Stop show button. After confirmation, the image reading, processing and print page creation is paused. Basically it stops and you can safely exit the application. But in the spirit of the event, we prefer to use the word 'pause'. Now you can process your printer queue if you like, or even exit the application. When you pause the show, the latest snapshot of the mosaic is created, and the locations of each placed image is stored, acting as a back-up when restart is required. When you have activated the dynamics (see here), stopping might take a few seconds to respond, since it first needs to complete the dynamics cycle.
A word of caution: the snapshot and backup of any previous show is replaced with the current one. So when you resume/restart a show, you must make sure that previous shows are not overwritten. Since only one show runs at the time, with usually a dedicated Watched folder, the risk of overwriting is kept very small if you carefully select your Watched folder. In doubt, always first make a full backup of your event (here).
To resume a show, there are two possibilities:
Some aspects to keep in mind: