Wordaizer -
Help Wordaizer -
Help |
User interface
Wordaizer is easy to use. There are a few basic controls and some
specific controls. The heart of the application has two functional areas and
eight buttons, each with a specific function. The status bar at the bottom shows some relevant
information, while the menu has additional input and output controls.
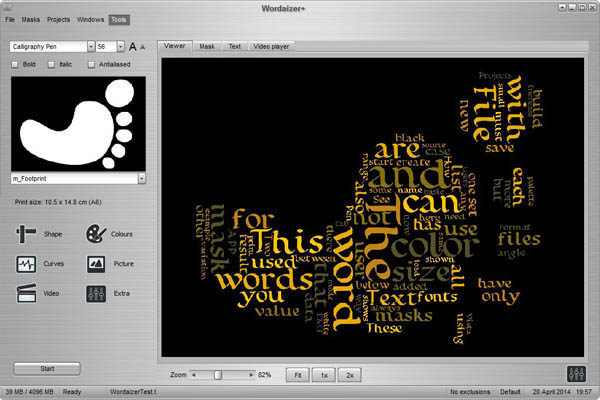
The Viewer, Mask, Text and
Video Player tabs
These three tabs (or 'pages') are used to view the resulting word
cloud (also referred to as the 'Canvas' ), to draw
a new mask (the so-called 'on-the-fly'
mask), and to replay the video wordlet.

The function
buttons
There are six groups of
controls to fully tune and mould the word cloud to the desired size, shape and
colour. Each button works like a tile: it shows a functional pop-up window which
is refreshed with every new click on one of the function
buttons.
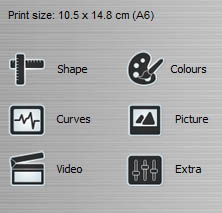
Shape: the text
settings
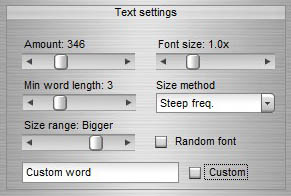
- Amount: the
target number of words that need to be printed in the word cloud. It depend on
the other settings how many and which words can actually be used to print in
the word cloud. For instance, for a large font size
and a high amount the number of actually
used words will likely be small. In that case a smaller font size is
needed.
- Font size: The
basic font size is selected in the tab 'Font
settings'. However, with this control a quick tuning of the best font
size can be done. The slider ranges from 0.5 to 2x the basic font size. In
case the tuning rangle doesn't lead to the desired result, you need to change
the basic font size.
- Minimum word
length: Wordaizer has no possibility to automatically remove common words from the word
selections for the cloud. Instead, we assume that common words
(in any language) are usually short words, so these can be simply
filtered by settings the minimum word length. This way common words like 'the', 'and', 'or', that' etc. are
effectively excluded from the word cloud. Also (small) numbers are excluded this
way. Wordaizer however uses a so-called 'exclusion list' approach, to manually add (as
an ANSI text file) to the application. This feature is for licensed
users only. More information is provided below (in the paragraph ''Menu'
and 'File').
- Size method:
the word cloud is built with words that decrease in size with decreasing
frequency of appearance in the text. The degree of decrease can be set with
the size method. There are basically four sizing methods ('steepest', 'steep', 'curved' and 'straight') and
two metrics to determine the size ('rank' and 'frequency'). All eight methods have a different effect
on the final result. A last method is called 'at
random', and does not follow any sequence to determine the font size of
each word in the cloud.
- Size range: the word cloud uses a range of font sizes, independent of the
amount and frequency of words that is available or selected. This range can be
set with this control. The range of size varies from Basic size/4 ('Biggest') to Basic size/8 ('Smallest') in steps of 1.
- Random font: when checked, with each word cloud a new font is selected at
random from the top 19 list of the available fonts.
- Custom word: most users will provide a text file
from which the word frequency is derived. An alternative to this approach is
provided where only one word (or sentence) in the edit box is used to build
the word cloud.
Shape: setting the size and
shape
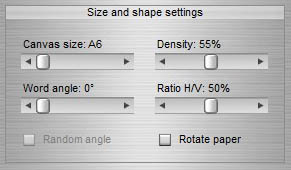
- Canvas size:
the size of the canvas, in print format. The range is A6 to A1 at 200 dpi. The
actual print size can be changed by any printer command, because this control
mainly sets the number of pixels of the end picture of the word cloud. For
convenience we use paper size and not pixels.
- Density: the
density of the words in the word cloud. The default is 50%, which is a
balanced trade-off between speed (density also means computing time) and
visual appearance (less dense does not always look very good).
- Ratio H/V: the
ratio of horizontally placed words over vertically placed words. A value of 0%
indicates that all words are put horizontally in the cloud. For any value
between 0 and 100% the actual ratio of horizontally and vertically
placed words is determined by a probability engine. The selected ratio is
therefore a target value, and not an accurate ratio that can be
set.
- Word angle: the words can be put in the word cloud at any
angle between 0 and 90 degrees. When any other angle is selected than 0 or 90
degrees, Wordaizer will try to create a cloud where the words are put on the
indicated angle. The H/V ratio then acts as the ratio
clockwise/anti-clockwise angles.
- Random angle:
when checked the angle is randomly selected between 0 and the indicated word angle.
- Rotate paper: when checked the mask is rotated anti-clockwise (as if the paper is rotated).
When rotating the mask, the edges (left and right) will be clipped to
make sure the size of the mask content is not getting smaller. In that case
please take care that a mask can be rotated without clipping the
content at the edges. Alternatively, you can also draw a sideways mask, and
then untick this option again. The 'Ratio H/V'
placed words will not swap with this option. It will remain as seen on the
screen.
Masks
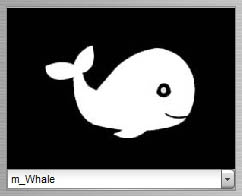
- The mask drop-down
box: the application comes with a number of pre-installed masks.
The drop-down list contains all the masks that are currently available in the
application. Each mask name must start with 'm_'
and must have the file extension '.jpg'. The
user can make masks, and add to this list via the menu commands, or manually
copy the mask file into the masks directory (see
here).

- Pen thickness:
the user can draw a mask 'on-the-fly' by using the
mouse as a pen on the (black) canvas (the 'Mask'
button). The line thickness of the (white) pen is set by this control. Pressing
the SHIFT
button while drawing, the pen becomes an eraser by changing its
colour to black. Please bear in mind: all masks must be in black and white
only, coloured masks won't work very well.
- The 'Draw' and 'Erase'
options will turn the mouse into a pen (white) or eraser (black).
- To reset the mask press
the 'Reset mask' button. The mask will be
fully erased. This cannot be undone.
- 'Mask
1' and 'Mask 2': you can create wordlets with two
different fonts. One font is attached to mask 1, the second to mask 2. In
the 'Features and Functions' chapter you find more information how to apply this
feature effectively.
- TIP: if you doubleclick on the mask (in the example
above: the alien) the mask is copied to the workspace (use the 'Mask' button) for
editing.
Font bar
settings
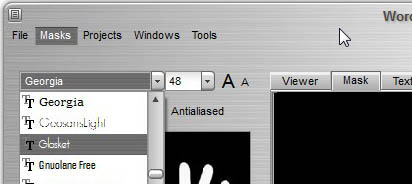
Available fonts:
this drop-down list shows all available fonts in the operating system. The top
of this list is an additional predefined set of 19 fonts. This top 19 is
used for font randomization.
- Basic size: (the size drop-down
box, here: '48') the maximum font size in the word cloud. There is an absolute
size, so in case the paper size is increased, the resulting word cloud will
look smaller. With a larger paper size, it is recommended to also increase the
basic font size. With the small buttons 'A'
and 'A' the size can
conveniently be increased or increased.
- Bold and italic: the typeface of
the font can be set. If set, the small tickbox will be
checked.
- Antialiased: the
rough edges of the font are softened. Some people experience this
effect as an unsharp edge ('blurry').
Text
edit
The text editing
functions are all located in the dedicated tab on text management. This tab is
always visible. The following functions are found on this tab:
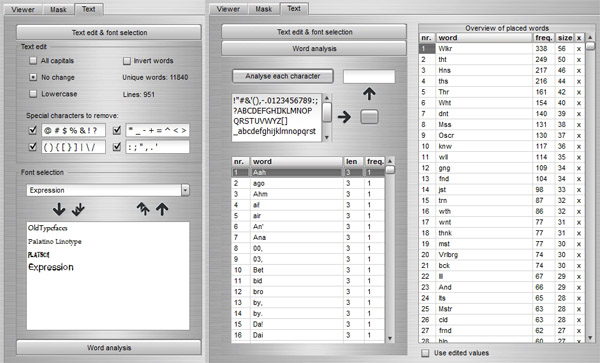
On the top-left you find
the 'Text editing' functions, on the bottom-left you
find the 'Font selection'
options. When clicking on the tab header 'Word analysis' the special functions for word
analysis become visible (obscuring the 'Text edit and font
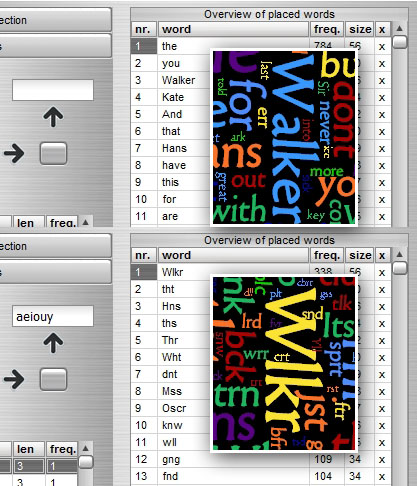
selection'). On
the right you find the full list of
placed words. The following functions are available:
- All capitals, no change,
lowercase: this selector determines how each word is shown in the
cloud. No change means: as
provided by the user, where capitalized words remain capitalized.
- Unique words and lines: a summary of the
statistics of the input text.
- Special characters to remove: the user can specify
which characters will be removed automatically when creating a word
cloud. After each change the text is re-read and the 'Amount' of words number is updated. It is
recommended to check the available amount of words. This could have been
changed due to a special character change. The default special characters
are already provided. You can edit these as well (add, delete), and are
grouped in 4 types for convenience. Each special character is separated by a
space, which has no effect on the characters to remove. Spaces are always
removed, because they represent the separators for each word. Also the tilde
(~) sign cannot be part of the removal list because this sign is reserved to
keep two
words together. So: 'My~word' is shown as 'My
word' in the wordlet, while 'My word' is shown as two separate words, as
'My' and 'word'.
- The 'Font selection' only has four
buttons. With these buttons you can select a font from the drop-down box,
containing all the currently available fonts. By pressing the 'arrow down' button he currently selected font in the
drop-down box is added to the fonts box below. These fonts in the box below
(here: Old Typefaces, Palatino Linotype, Platsche and Expression), are now all
(randomly) used in the wordlet. This way you can use several fonts in one
wordlet. The other arrows are: 'double arrow down': add all fonts to the fonts box, 'double arrow up': remove all but one fonts from teh
selection box, and one 'arrow up': remove the currently selected font from the
fontsbox. Only when two or more fonts are shown in the box, the multiple font
options is activated. When only one font is shown, this box is ignored and the
usual font (main GUI) is used.
- 'Analyse each character': after analysis all the
individual characters are shown in the rectangular area below the button, and
the full list of unfiltered words, found by only removing the spaces in
the test, assuming that words start and end with a space (or line
feed). In this list also the special characters, like ')', '>', '*'
and '%' are shown (if found present). By pressing the little sqauer button
(following the two arrows) this list is transferred to the littble box at the
end of the upward arrow. In case a wordlet is created all
the checked characters in the 'Text edit' box together with this additional list
are removed from
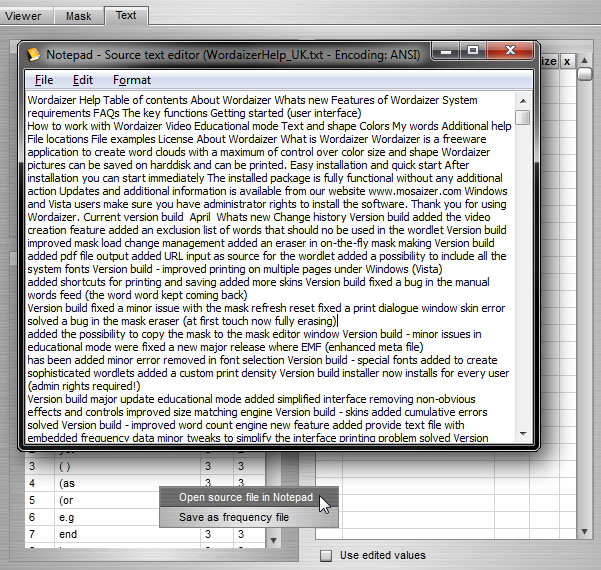
the words. This means: if you put some vowels (aeiou) in this box,
your words will be placed without their vowels. With each wordlet creation the selected (checked)
characters are re-read and used in the wordlet. An example of
some different settings is shown below.
Pictures above: Bottom: the vowels
'aeiouy' are left out. Top, all characters in the alphabet remain
untouched
- The words list (in the Word analysis part): these are all the words
that were found in the text file. If a word is not separated by a space character
(at the end of the word), this character becomes part of the word, and
is only removed when put on the removal list. As an example you can see the
words 'to!' and 'to.', both having a special character attached to it. When
the '!' and the '.' are part of the removal list, they will be deleted from
these two words, and the frequencies of both words are added.
- Use edited values: in case the frequency is not in the right balance, the user can
change the data. Each time a word cloud is made the frequencies and sizes are
recalculated. When this must be skipped, check the tick box. The application
will then use the frequency as indicated in this table.
- The 'x' in the fourth
column indicates if the word is used in the cloud. This value cannot be set, and is
provided to check if the most relevant words are actually printed in the
cloud.
- The 'size' in the last column
indicates what size was calculated for that word. This is useful to determine
the balance of size of the word cloud.
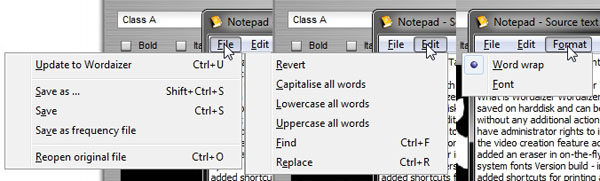
The Notepad Editor
When you right-click on the small Word
analysis table, you can select two options: 'Open the source
file in Notepad', and 'Save as frequency
file'. The latter is identical to the same
option from the main menu, but the first opens a Notepad-like Editor:
This Notepad Editor has a
couple of features, available from the menu:
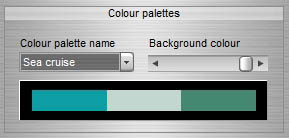
-
File
- Update to Wordaizer: when you are done editing, you can re-submit the text file (from
the Notepad Editor) to the application. The original file won't be repleced
though.
-
File
- Save as: save the
content of the Notepad Editor in a (new) file.
-
File
- Save: save the
content of the Notepad Editor in a original file, effectively replacing the
old text file. This cannot be undone!
-
File
- Save as frequency file: the same file output as done from the application's main
menu.
-
File
- Reopen original file: discard all the changes you made in teh Notepad, and reopen the
currently active original text file.
-
Edit
- Revert: reload the
currently active text file in the Notepad. All changes you have made are
lost.
-
Edit
- Capitalize all words: of all words the first
character is written in its capital. This only works when
all the words are put in lowercase first.
-
Edit
- Lowercase all words: all the words are written in lowercase.
-
Edit
- Uppercase all words: all the words are written as capitals.
-
Edit
- Find: the same
functionality as in the Windows Notepad, it pops up a small window from which
you can search text strings.
-
Edit
- Replace: the same
functionality as in the Windows Notepad, it pops up a small window from which
you can search and replace text strings.
Colours
Wordaizer has three different approaches to settings the
colours for the word cloud. A fourth personalize colour scheme is provided in the
'Extra' function tab (described
here). These are:
- Colour palettes: these palettes have a limited number of predefined colours,
and are derived from GIF files (this is the default colour
selection)
- Colour variations: starting from a
selected colour new colours are derived, following the hue ('rainbow') colour
scheme
- Colour schemes: these colour schemes follow the
colour harmony methods as known in the more theoretical world of
colours
Colours: colour
palettes
- Colour palette
name: the name of the GIF file that
carries the colours of the palette. These files are located in the colours
directory (see
here).
- Background
colour: moving the slider will select a different colour from the palette
as the background colour of the word cloud. The first colour is always the colour
of the windows panel, the last two colours are always white and black.
When a background colour is selected from the colour
palette, this colour is excluded for printing words in the cloud.
Colours: colour
variations
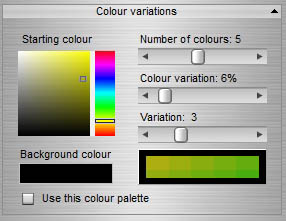
- Number of colours: the number of word colours, varying from 1 to 10.
The colours are seen in the top half of the little rectangular colour patch
box.
- Starting colour: The starting
colour, from which the next colours are derived. The large rectangle is used to
set the luminance and saturation of the colour range, the rainbow slider
selects the hue of the starting colour. The colours that follow from the
selected hue climb up the hue ladder. When the number of colours is higher
than the hue scale, the colour range continues from bottom-up. Actually, the
hue is not a linear range (as the colour picker suggests) but it's a
circle.
- Colour variation:
the distance between the basic colour and the next. A low distance results in
colours that gradually 'climb up' in the rainbow, a larger distance will
result in continuation from the bottom.
- Variation: each colour can be
varied at random. The effect is shown in the lower half of the colour patch.
The larger the variation, the more deviation from the colour can be expected.
The actual variation of each character is selected at random (but within the
variation boundary).
- Background colour: the colour of the
canvas. Most word clouds look very nice on a black canvas,
but each colour can be used.
- Use this colour
palette: when checked it overrules the other two colour selection
methods.
Colours: colour schemes
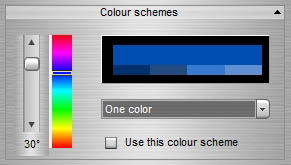
- Use this colour
scheme: when checked it overrules the other two colour selection
methods.
- The drop-down
box: this box contains 6 different colour schemes, from 2 to 4
colours. The schemes are reflected by the colour patch, where the top colour is
the basis, and the 4 little rectangles below are the harmonious variations per
colour. All colours are used in the word cloud, incl. the variations. In this
way 5 to 20 different colours are generated.
- The vertical
slider: this slider sets the distance between the harmonious colours, in
degrees of the hue value.
- Use this colour scheme: when checked it overrules
the other two colour selection methods.
Zoom bar

With the zoom bar at the bottom of the Viewer window the user can
zoom in and out to inspect the quality of the word cloud. Especially when the
cloud needs to be printed, this zoom bar can help to make sure that the result
is perfectly readable after printing.
The menu
The menu
is mainly used for input and output, and also contains some useful
tools.
File
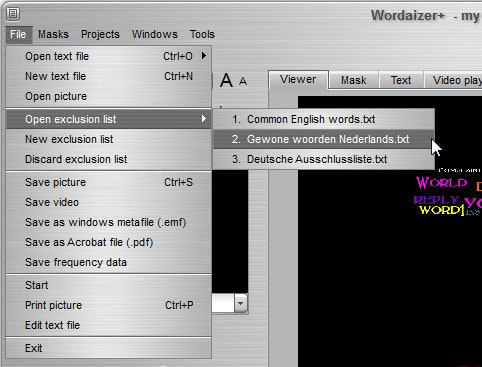
- Open text file:
select one from the subset. This history list has a maximum of 10.
- New text file:
navigate to the desired file and load this new file. It will appear on the top
of the history list.
- Open picture:
opens a picture to use as colour source.
- Open exclusion
list: loads a text file of words that should not be used in the
wordlet. This file must be prepared by the use, and must have single words on
each new row
- New exclusion
list: adds a new exclusion list text file. The name of the active
exclusion list is echoed in the status bar on the right. An example of an exclusion list is given here.
- Discard exclusion
list: deleted the exclusion list
from memory. The list will have to be loaded again to be used.
Also the 'ticked' file is now unticked.
- Save picture: the canvas can be saved on harddisk. Four formats are
available, the default is '.jpg', the other is bitmap ('.bmp', uncompressed),
and two .png formats: opague (basically a lossless compressed bitmap) and
transparent. The latter format stores only the test while the background is left out. This way perfectly transparent
wordlets are created.
- Save video
file: save the video. The default file extension is .avi. No need to
specify this in the file name.
- Save as windows
metafile: the final picture can be saved in the vector format
('.emf' file format).
- Save as Acrobat file
(pdf): the final picture can be saved in the acrobat
format ('.pdf' file format). You need a (free) acrobat reader to
read these files.
- Start: in case
the Start button is not visible (screen too small)
this menu entry willl be helpful
- Exit text
file: the default text editor is opened, the user can edit the text,
save and read the file again
- Print picture: a special print layout
interface is shown.
Windows
metafiles
The Windows Metafile
(.emf file extension) is a very special format. It does not store the bitmap
result in pixels, but uses so-called 'vectors'. The really big advantage is that .emf files can be blown to giga dimensions, because
the vector approach (instead of a pixel approach) preserves the sharpness of
the text. Files of type .emf can be used to create giant posters, meters in size, and
preserve the sharp text as if it was a high density megapixel bitmap.
This
format is comparable with the .pdf file format where text can be enlarged as
big as you want. There is a minor drawback: if the font with which the .emf is
created is not on the system it will use a default font, and the effect of the
wordlet may be quite unexpected. For that reason, when saving in the .emf
format, the user is always asked to also copy the font in the windows
system to open the .emf file
while Wordaizer is not active.
Some
characteristics
of
.emf files:
-
can
only use one font, and the font cannot be stored ('embedded') in the file
itself
-
can
be significantly smaller than (large) bitmaps because it only stores vector
data, not 24bit pixels
-
are not always consistent and may vary per system (but in
99.99% is goes fine)
-
cannot be read by
every bitmap editors (not in Photoshop!), but can be read in Firefox,
Paintshop Pro, IrfanView, (Windows) Paint and of course Adobe
Illustrator.
Masks

- Load mask: a new mask can be
loaded into the program. This will be shown in the 'Mask'
window.
- Save mask: each mask that is shown
in the 'Mask' window can be saved. A mask is saved on a specific location on the hard
disk (see
here). If not saved on that specific
location the mask is not available by the application. The default location
when saving is the correct location: don't change it. The mask name
must have the file extension 'jpg'. Other formats will
not be recognized at program start. Existing masks will be overwritten if the
same name is chosen.
- Reset mask: when
a mask is drawn by hand (using the mouse as a pen), the mask can be cleared
(so: made black again). Alternatively use the shift key while drawing: this
will change the colour of the pen to black and effectively does the same
thing.
Projects
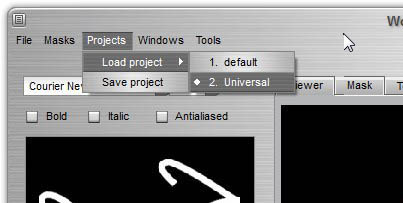
- Load project:
load a project from the list. The default project should not be overwritten,
unless you want to change the default settings of the application.
- Save project: a prompts appears
asking for a project name. Any name will do, but the file extension must be
'mpr'. Do
not type the file extension yourself; the application will do this
automatically.
Tools
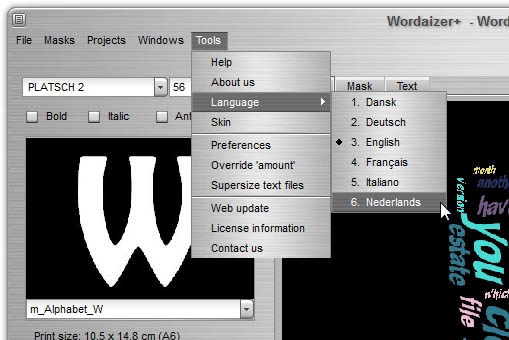
- Help: you are
redirected to our web Help site.
- About us: showing
the current version of the application.
- Language: select
the language of your choice.
- Skin: select the application skin at your
choice.
- Preferences: see details below this paragraph.
- Override amount: this allows you to create multiple repeats of the
same list. This is very useful when there are too few unique words in your text
to full the mask of choice. It will then repeat the same list again,
until it reaches the amount of indicated words, as indicated in 'Amount'. Be careful when using this option,
because the 'Amount' slider
will allow for 100 times the amount of unique words.
- Web-update: to check if a new version is
available.
- License
information: you need a valid license to use the application for
commercial purposes. Contact APP Helmond for more
information.
- Contact us: in case you want to send us an email,
this menu command will start your default e-mail client. In case you use a
web-based e-mail client (hotmail, gmail, yahoo mail), you don't need this
service. Use this e-mail address:
 .
.
Preferences
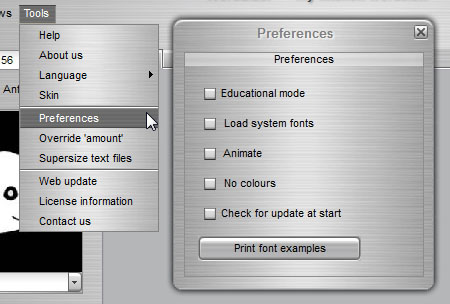
- Educational: when
activated, the user will be prompted to restart the application. The
educational mode will then become active, as explained
here . The educational mode is switched back to the full mode by
unchecking this option (and restarting the application). Load system fonts: for licensed users
also the currently available system fonts can de added to the application
fonts list.
- Load system fonts: when
checked also the system fonts will be added to your font
selection box. Only for licensed users.
- Animate: the result
is usually shown after all words have been placed and the picture is ready.
When this option is checked you can watch the words being placed. It's just
for fun, no particular reason or functionality is attached to this feature. When
the option is unchecked the animation will stop.
- No colours:
in case the result has to be
simply black and white, e.g. for printing, activate this option. It will print
black text on a white background.
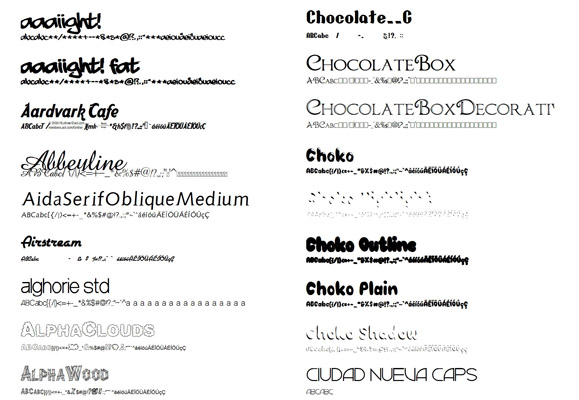
- Print font examples: all the installed fonts are printed on one page. You can save
the page for printing. See picture below. The
first line is the name of the font, the second shows the ability of the font to
print special characters. The special characters to test its ability are:
ABCabc[{/|)<=+-_*&%$#@!?.,:;"~`^áéíóúÄËÏÖÜÁÉÍÓÚçÇ, but of course there
are more. This should also warn you
to use a font that meets your character requirements. For instance: French has the ç character, and
German has the ö character, etc. But also the + and=
signs are not always possible
with a certain font. It's your own responsibility to choose a
font that meets your requirements.
- You can add your own fonts,
temporary or permanently: simply install the font in your system. To add a
temporary font (only available when Wordaizer is active), copy the font to
C:\Users\Public\Documents\APP\Wordaizer\Fonts. For
creative users who want to define their own set: rename the Fonts folder (e.g.
Fonts_Original), and replace this folder with your own folder (must be
called 'Fonts' to avoid error messages), containing the fonts of your
choice. The fonts are only read at start, and cannot add fonts at
runtime.