 Dynamic Mosaic -
Help Dynamic Mosaic -
Help |
Dynamic Mosaic -
Help
Recipes for dynamics
The
number of controls and possibilities may be experienced as confusing. In this
chapter we
will explain what typical combinations of settings will result in what type of dynamics. Please
be aware that the number of combinations are quite high and
we can only explain a few of them here. You need to text the best
'recipe' yourself. The following controls are important to use with great
care: These are the basic choices you need to make before
attempting to randomly change these parameters: 1. You mainly want to use a tethered
camera, booth cam or web cam pictures When this is your preferred interaction with the
audience you should not activate to revert the flying path. The flying path
will always start from a full page preview, then fly towards the
mosaic. An initial mosaic needs to be made prior to starting the dynamics. The
application will always try to match the new picture with the mosaic;
and in some cases this will result in pictures having some kind of preferred
landing spot in the mosaic. The reason for this landing spot is because the
colour of the booth (etc) picture is best represented at that spot in the
mosaic. 2. You want to fully use
transparency and gradually build the source picture
With this preference setting you should first use a
valid transparent picture (.PNG format) where the alpha channel is properly
made. The transparency settings should be either 'at
start' or 'at end'. When you want to build a
source picture from an empty canvas you should also activate the option to 'Clear'
the mosaic after creation (with the background colour).
In this case the initial mosaic is fully wiped out and replaced by the
background colour. The mosaic tiles however are still in it's
memory. Some rules of
thumb
Scenario
builder
This is an experimental feature to quickly create the
correct flying, snapshot and transparency settings. The settings of these can
sometimes be confusing to cater for the several options. The scenario builder is
not foolproof, you always need to check if the show is really as you want it
to be. The scenario builder has 6 different controls to set.
Some controls are dependent, so if one is set, another may get locked with a
preset selection. These are the different settings for each
scenario aspect. The settings of the scenario builder will not interact
with the other settings of the GUI, but only between each other (like explained
above). When you are satisfied with the settings, you must use the 'Create scenario' button to synchronise the builder
settings with the other (normal) GUI settings, and save these as a normal
project file. Only when you have saved as a project file all settings between
the builder and the rest is synced. You can now use the
project files for easy retrieval of the
builder settings. When you save the scenario also the current selections
(checkboxes) of the source and commercial files are stored. In case you
are opening and loading an existing project you should ensure that also the
pictures are available. It will not keep the selections by name, only by sequence
in the overview. So, adding new pictures after having saved a project
might lead to different values from the project
saved settings!
From mosaic controls:
Colour engine
Flying tile size (manifolds)
Clear the mosaic (or not)From admin controls 'Animation':
Transparency
Revert flying pathType of input image
The mosaic creation will continue until the commercial starts, after
which a new mosaic is created from the source picture of the checked source
list. This setting will generally lead to a continuously realistic mosaic
impression.
The mosaic matching engine will only affect the initial mosaic,
and has no influence of the placement of the new snapshots. A nice effect could
be to start with a full random picture (engine 'Full randomization') and then
let the mosaic rebuild itself with new pictures from either the library or booth
(etc) snapshots.
Transparent pictures can be used (line .PNG files). The
options for transparency are fully used: 'No
transparency' (so basically discarding the alpha channel of the .PNG
file), or 'Transparency at start' (where the picture
already is made transparent where it needs to be when shown full screen) or
'Transparency at the end' (where the final placement
step is to make these parts transparent).
The flying direction now depends on the tile sources:
When the sources come from booth, cam etc: the
flying path will always be flying into
the mosaic, starting at large. The
colour matching engine is not used for new snapshots, only for the initial
mosaic. The landing spot will be selected based on the the best possible
colour match with the source picture.
As above, but now you have selected the 'Full randomizaton' colour engine.
In this case the initial mosaic data is discarded and replaced by an
internally managed index that has determined which tiles can be placed, and
therefore avoiding transparent tiles. For example: a 12x16 mosaic requires 192
tiles, but 24 of these are 100% transparent, so these positions will be
removed from the landing spot index list. The remaining locations are then
randomized and build-up one by one. In some cases very small pieces of tiles
are built-up and seem to almost disappear in the mosaic. All tiles will always
fly into
the mosaic.
As the first option but now you want to use manifold
tiles. In this case you cannot use a tethered cam, booth etc. Only pictures
that are found in the current library folder are used. There is no option to
use new snapshots in the current version. After creating the initial mosaic a
fully colour matching mosaic is made. If the option to 'Clear' the canvas as well, also the start of the
dynamic mosaic is an empty screen (only background colour). When the dynamics
is started the application will rebuild the initial mosaic in 2x2, 3x3 etc
tile combinations. Each manifold is loaded from the existing files in the
library folder. After completing the mosaic a commercial is forced to start
after which the mosaic creation etc is started with the next source picture.
In case new pictures are added to the library folder these will be used when a
new initial mosaic is created. All tiles will always fly into
the mosaic.
As the first option, but you have chosen to
revert the flying path. In this case you should not activate
the 'Clear' option because the flying path is now
from small to full screen (flying out). When selecting 'Clear' you basically start with an empty screen where
small pictures fly out but have no apparent relation with the mosaic. Also the
manifolds have not meaning because it will not be active when the 'Clear' option is unselected. Basically, when the 'Clear' is unchecked the manifolds are always
deactivated.
Manifolds are only active when the 'Clear'
option is active. Otherwise 1x1 is active and the slection box is
grayed out.
Reverting the flying path will
not actively listen to tethered cams etc. It will only show tiles from the
existing mosaic.
The 'Full randomization'
engine allows for rebuilding the mosaic from randomly selected pictures. This
option will keep listening to new snapshots coming in and will use these when
they are found. The 'Clear'
and manifold features are
fully applicable.
When snapshots must actively be included only the
flying in
path can be used (discarding the
revert option).
When the 'Revert flying
path' option is active no
new snapshots are added to
the mosaic.
Transparency can always be used, building from a
clear canvas, or rebuidling a fully visible initial mosaic with new
snapshots. The transparency can
be set to at start or at end in
that case.
When no transparent source files are use it's
better to inactivate transparency to avoid unnecessary bitmap and
pixels calculations.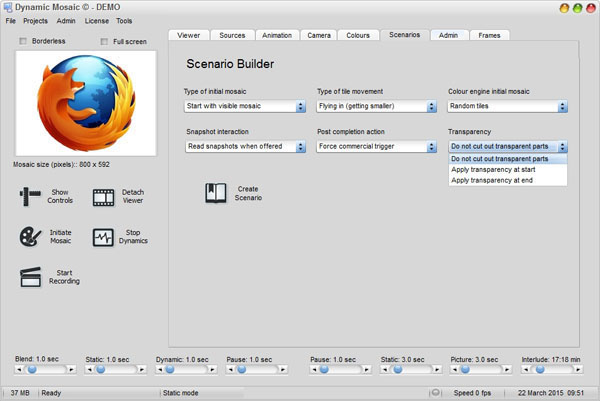
Type of initial mosaic: Start with visible mosaic or Start with background
colour. This setting will also determine which kind of flying moment is
possible. When starting with a background colour the tile movement will
always be
flying in.
Type of movement: Flying in (getting smaller) or
Flying out
(getting bigger).
Colour engine initial
mosaic : Random placement, Optimized distribution, Force
all tiles or Fully randomized. These are the same colour matching engines as
in the normal mosaic settings. Only the 'Full
randomization' has a special effect when combined with
starting with a background colour and
using transparency.
Snapshot interaction: Read snapshots when offered or Ignore new snapshots. When
new snapshots are found the application will act as normal: make a copy (or
not, when indicated as such), add the new snapshot to the library folder, and
add the new file to the list of images, indicating with an 'x' that is was
a snapshot.
Post completion action: Force commercial trigger or Wait until commercial is
triggered. In all cases the commercial timer is used to show a new commercial,
and therefore replacing the mosaic with a mosaic of the next source picture.
When a commercial is forced the commercial timer is overruled. If you want to
make sure the mosaic is completed you also need to make sure the commercial
timer is set to a sufficiently long period to not accidentally clear the building up mosaic
and start all
over again.
Transparency: Do not cut out transparent parts,
Apply transparency at start or Apply transparency at end. The transparency is only available
when an alpha-channel is found in the
source picture.