 Brickaizer -
Help Brickaizer -
Help |
Brickaizer -
Help
Tutorial for Bricks
Brickaizer is easy to use. There are a few basic controls and some additional controls. In this chapter we will
guide you in a few easy steps to make a perfect mosaic
blueprint. We will first explain how to make a brick mosaic blueprint, then we will
show how to tune and play with the different controls. Lesson 1: My first
brick blueprint (but a bit boring)
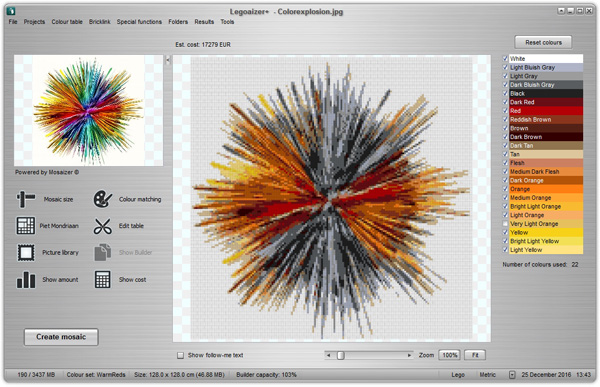
After
installation the interface is seen full-screen. On the right you find the
available colours, on the left the default source picture and some control icons
(actually... these are buttons). In the status bar on the bottom youalso notice
that the correct colour data set is loaded:
'BricklinkStartSet'. The make your first blueprint press the 'Create mosaic'
button on
the right-bottom. And you are done. This is what you will see: Lesson 2: Selecting
the colours
As you can see,
many colours have been selected in this mosaic. Perhaps a bit too many, because you
don't have or don't want to use all these colours. Or perhaps some bricks and
colours are too expensive to use and you want them to be excluded or limit. The
easiest way is to simply exclude them from the list of selections is by
unchecking the colour on the right side of the interface. So, let's deselect all
but yellow-orange-red-brown and gray colours. Then press the 'Create
mosaic' button again. Now you have a completely different result. Lesson 3: Selecting the bricks
But in some
cases you not only want to exclude colours, you want to completely avoid the use
of some bricks, e.g. 2x4 or 1x12 studs. This is done in a slightly different
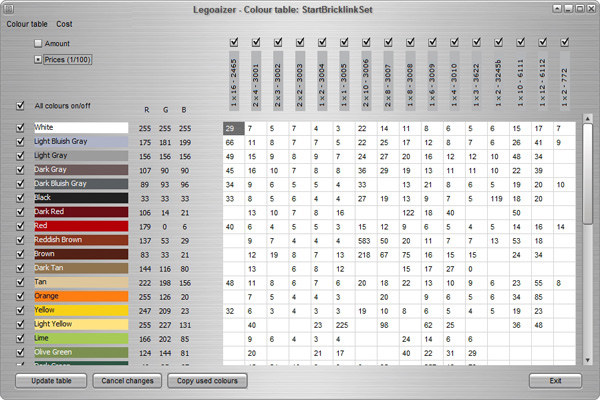
way. You first need to open the set editor by clicking on the 'Edit table' button
on the left. This will generate the colour and brick combination table. This table is the heart of the mosaic engine: it
stores all the information that you will use to make a mosaic blueprint. It
contains all the popular colour-brick combinations currently available in the
market (pre-set at installation). On the left you see the colours, on top the
possible brick shapes, and the table itself contain numbers, meaning:
"this brick-colour combination is available in the
market and costs xx (euro)". A word on the value: in the 'Preferences' you need to indicate the 'unity' of the prices. A unity of '100' means: my price
data is multiplied with a factor of 100 in the Edit table. So, a value
of 29 in this table actually means 29 eurocent. On the top left two radiobuttons are shown which we will use
in a next lesson in which we will show how to set a limit to the
use of certain brick-colour combinations. The exclude a brick-colour combination simply delete its value.
To completely exclude a brick, e.g. 2x4 you need to uncheck the tick box
above that brick in the table. And to exclude a colour uncheck the colour row (using
the tickbox on the left of the colour). The table is immediately updated with
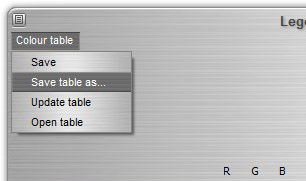
the changes. But you need to save the changes. Or exit and discard upon which
changes are lost. To save the change (overwrite current setting) select 'Colour table' 'Save' from the menu. To save the changes in
a new table select 'Colour table' 'Save table as'
and choose a new name. In that case
the changes are NOT yet applied in the current table. You need to first make a choice: save or discard to use
these settings! To avoid overwriting the current table simply press 'Colour table' 'Update table'. All changes will be temporarily applied, but NOT stored
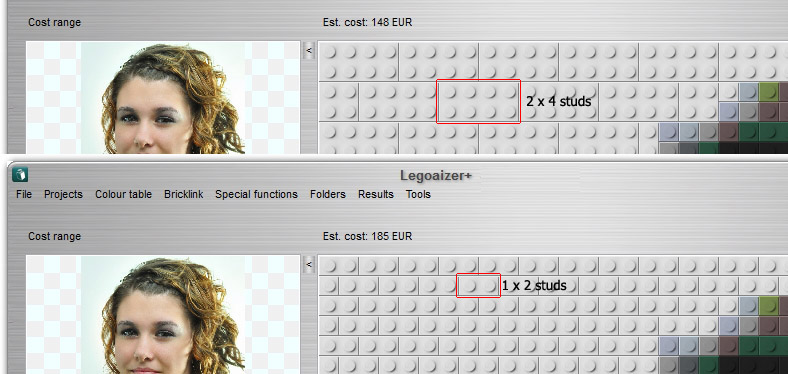
upon exit. If done so, let's create a new mosaic. Note the apparent changes in use
of bricks and colours. In some cases, e.g. exclude expensive bricks, the effect in colours is hardly noticed,
but the estimated cost can be largely affected since e.g. one 2x4 is a relatively
cheap solution compared to using the equivalent of 4 times a 1x2 brick. In the picture
below you can see the effect of completely deselecting the 2 stud
bricks from the editor (bottom picture). Lesson 4: Setting a maximum use of a
certain brick
Open the
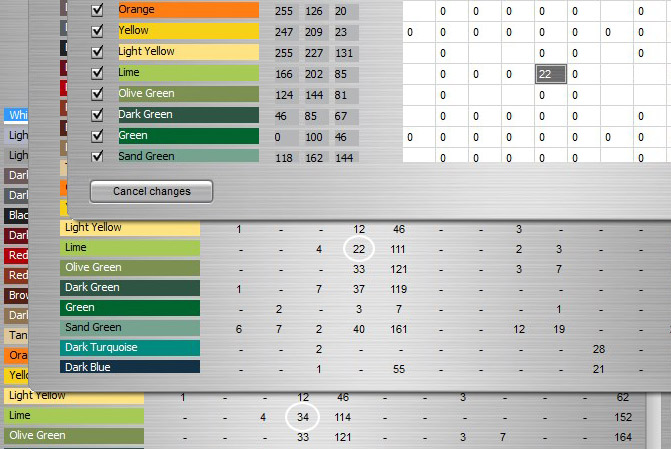
Table Editor again. Now select the radiobutton 'Amount'. This will show a similar overview of
the checkboxes in lesson 3, but this time it will show an overview of the
amount settings. All values are set to '0', meaning "Don't set a limit to a
brick-colour combination". At (default) start all values are set to 0 to allow for
all possible colour-brick combinations. Suppose you have a very rare set of
coloured bricks, e.g. the 'Lime 1x2' brick. The original mosaic uses 34 of these,
but you only have 22 of them. So you need to set this value to 22. Now
create the mosaic again. Then open overview of amount by clicking on the 'Show amount'
button
which has become active after a successful mosaic generation. When you now look at
this popped up table you will find the 'Lime 1x2' brick has been
used 22 times exactly. Apparently the other 12 bricks have been replaced with
other available bricks and colour that matched this purple colour the best. Lesson 5: Using different colour matching
engines So far we have
been using the default colour engine. This engine evaluates each colour of
the source and matches it with the best option from the available colours. Not from
the 'available bricks' because the colour engine does not take brick availability into account, that is
done by the brick-placement engine. Not mentioned anywhere but extremely
important to realize. The colour engines are shown by pressing the 'Colour matching'
button on the left. Let's use the colour dithering engine. There is
one dithering engine available (Floyd-Steinberg), and its effect can be blended with the
non-dithered picture. This combination provides quite a subtle use of
the dithering engine. Again, it's a matter of taste and in many cases
dependent on the colour content of the source picture. In this lesson we select
the 'Floyd-Steinberg' engine and let the
blend value remain 1000% and then hit the 'Create
mosaic' button. The effect is drastically
different compared with a non-dithered result! At close range the mosaic seems
randomly coloured with many speckles of 1x1 bricks. But after stepping back a
few meters from your monitor, the effect is amazingly realistic! Similarly
you can select a gray-scale or black and white engine. More examples and
background information of the colour models is provided in the 'Functions and features' chapter. Most important to
remember: the final colour selection is a personal choice, based on personal
taste, brick-colour availability and creativeness. In some cases when
only a very limited amount of colours are available the different black and white dithering engines can be a good creative alternative.
In the picture below from left to right: Black and white dithering
(ordered), Floyd-Steinberg black and white dithering, Threshold (automatic levels) and Threshold (maximum level).
These four filters are basically standard effects from any serious bitmap editor.
Lesson 6: Setting and reducing the amount of
colours
An
interesting comparision can be
made
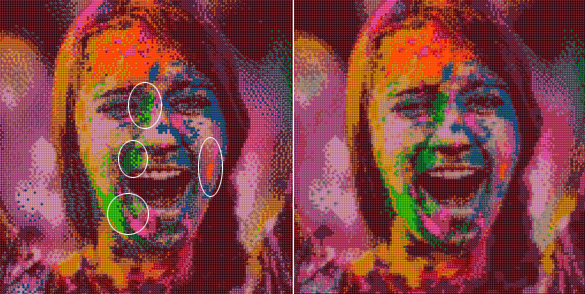
between a normal mosaic approach and when using the Mosaizer XV colour
matching engine: what is the effect on the end-result when colour reduction is
applied? In the picture on the left (below) you see the result of
the normal engine, and on the right the result of the Mosaizer XV engine when we
have set the maximum amount of colours to 32. At first sight not much difference,
but looking closer you see much more smooth colour changes with the Mosaizer
XV engine
than
with the normal engine (indicated in the white ellipses). The result of
Mosaizer XV is visually better. So what happened?
First you need to set the target amount of colours by
activating the 'Limit to # of colours:' option.
We have set that value to 32. The example picture is a 128 x 128 stud picture,
with a Combo dataset (see here to
learn more about the combos). Also activate the option 'Apply' and 'Use pictures
for layout'. These options are both found in the Colour settings
('Colour matching' button > 'Photo mosaic' box) Then press the 'Create mosaic' button and wait for the result; the picture on the
right. As also indicated below the list of colours on the right of the interface,
about 60 colours are still used. That is weird... because we have selected a
maximum of 32.
Now deactivate the option 'Apply'. Now the normal colour matching engine will be
used. Press the 'Create mosaic' button again, and wait fore the result (much slower...). Now
you will see the result on the left, and indeed 32 colours are now selected.
Fortunately the database had 290 colours, so 32 of them matched
perfectly. Smaller colour sets can lead to a deviation of the final amount of colours used
(usually less than indicated with the maximum value).
The reason of the difference of amount of colours used
is that the Mosaizer XV engine still has the freedom to select the colours it
needs, also after the pre-processing step has reduced the amount of colours to
in this case 32. So: the Mosaizer XV engine does not effectively
reduce the number of colours, but instead it will try to make a better colour
fit.
Finally a technical note on colour reduction: it will
reduce colours by applying a dithering algorithm. This way far less colours are
required to get a very good colour impression. Dithering is comparable with
inkjet dots, where only 4-6 cartridges of colour are needed to basically make
hundreds of thousands of colours.
Epilogue: What else is there to
do?

In general the dithered engine is slightly more expensive
because it uses many (relatively expensive) 1x1 bricks. When we change the
blending amount to a lower value, e.g. 50% the result is somewhat less
realistic, but a good colour impression still remains. A blend value of 0%
is of course the same as no dithering. In the picture below a
comparison of three dithering blend values is shown. As the mosaic source
picture we used only 16 colours for our cutest puppy photo.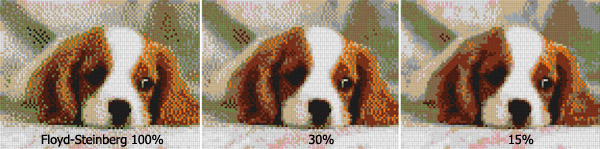

Brickaizer has many more
features. All features are explained in the other chapters. To mention a
few:
Using colour filters to
tune the input source colours and match with the choice of brick sets and
colours.
Using real pictures
instead of computer generated bricks (based on the colour
definitions).
Making a brick video from
a source video, and rendering it in brick and colours.
Save your project, and
restart it the next day from where you left it.
Use
Standard Colour sets, and buy some spraypaint cans to paint your bricks.
Quite some work but absolutely rewarding.
And much less expensive because you can now use the very cheap 1x1 and
2x2 bricks.
If the contents of a
brick-colour combination don't provide the bricks that are needed to
complete the mosaic a warning will be shown ('The mosaic could not be
completed with the current choice of bricks. Please add more shape
variety.') then a partly completed mosaic is shown, like the example
below: the gray chessboard pattern indicates a hole in the
mosaic.
